I have enjoyed this unit a lot, during the first few weeks it seemed like I was getting into a lot by agreeing to do things that I knew I wasn't very good at. I am very pleased with how much I have moved on since then, Its only been a few weeks but I already seen my improvements showing clearly on my work. As I am working on 3 different films I couldn't really pick an area to research as I believe that all films are as important as each other. That is why I have chosen to research mainly on three areas.
For Kofi I have looked into nCloth as I know he will be looking at doing a scene where this might come in handy. When I first told him about it he seems very interested in the idea if I could get it to work, right now I confidence in myself to deliver what I suggested to him
For Joes film he asked me to model and possibly sculpt a character, as I already have skills in modelling I thought I would give sculpting a go as I'm not too good at it. That has also turned out to be quite successful and I am very please and confident that I can deliver if he chooses me to model for him.
For Andy's film I have looked at UV mapping and texturing, only because he's asked me to model a few things and that's it. the modelling took a few days but I knew it wasn't finished so I set myself the task to learn UV mapping and texturing and that too has turned out to be a success. I am very pleased with the level of progress in the term and for this unit.
there are ares where I should have tried harder but I just couldnt find myself doing it, I would like to know more about it but I personally find it a little bit boring. Such areas are rigging and lighting.
Monday, 10 January 2011
Sunday, 9 January 2011
nCloth test for Hero
For hero I suggested that we tried to use Maya's dynamics to create a duvet for the bed in the scene, for this unit I thought it would be good to try it out and see what I could achieved. Here is what I came across while on the task.

In the image above you can see the stage after I have created nCloth in Maya, at this stage all that is happening is the default gravity in Maya is pulling the cloth down. I found that it will not interact with its surroundings, in the case the bed, if you don't tell it to. To allow objects in the scene to interact with the cloth I needed to add to the object the tool called Create passive collider. This will allow the cloth to land and take form around the object.

at this point in the task I found myself trying to make the cloth stay on the bed, as you can see in the image below the cloth is sliding off to one side, I tried a number of things like trying to key frame is position to stop it falling off, this didn't work and I found myself searching through the internet. After a long while I found that when you add the Create passive collider to an object it creates preferences allowing you to increase certain options on the object. These options are Bounce, friction and stickiness.
What I found when upping the Bounce up to a higher number then 0.050 you will get a slight bounce of the mattress when the cloth hit it, which in real life does not happen. I turned this option all the way down. When it came to friction I found that I had found the answer to my earlier problem, when I turned this up and played my animation through the cloth stayed on the bed and did not slide off. I was very pleased with the results. stickiness is the opposite to the bounce option, it means that if the cloth hit it once then it would stay in that position and not move, it would also have very little influence when it becomes effected by Maya fields such as wind or gravity.
It seemed like the more and more I looked into nCloth and its options the more and more problems my cloth got. After close inspection I realised that I was getting mesh deforming into itself, the image below shows what I mean with this problem.
I found out that this is called clipping and its very common when using nCloth, there are options to pain on thickness where is happens but I know that it's not too noticeable when the cloth is thinner, as you can see its way thick in my project. I will later try and thick this by scaling the mesh down.

I came across a rather simple problem when it came to nCloth; this was that I couldn't change the colour of my Lambert! It's usually in the attribute editor but it just wasn't there, I was stuck with red if Kofi asked for a different colour. As you can see there is no Lambert attribute menu.

I researched how to do it and I kept finding AE display under the nCloth submenu, however, these were all on earlier versions of Maya and in Maya 2011 it wasn't there. After a few hours of trying I found myself in the help menu of Maya and asking for AE Display, this is what came up

Another problem solved. I could now change the colour of my mesh! (I late found out that I could have also used the hypershade......)

While doing my research I came across a very interesting tool which allowed me to play with the mesh while it was being animated. For example I could interact with it mess with my passive colliders such as the mattress.
In the pictures bellow I tired to show what I meant. The tool is called interactive playback, and I used it to quickly move the mattress up then down to get result shown bellow. I know it won't seem clear but the mesh actually turned almost 360c.

This next image is of another interactive playback test, I tried a smoother approach and let the cloth deform slowly, it wasn't a perfect deformation but I could see how the gravity was affecting the cloth.
It was quite fun!

My next problem with nCloth was this strange space that was leaving between the mesh and the passive collider,

I must admit I almost gave up on this one, what I found that kind of work but reset itself each time was moving the passive collider to the right place once the mesh had settled, this was obviously pointless and could not be used in a final film. The gap was really annoying.
what I found was that in the attribute editor you have an option of seeing the collision thinness, this is available for both nCloth mesh and Passive colliders, if you look under collisions> solver display you can see that right now it's turned off so I cant much at the moment.

As I turned it on for both mesh and passive collider this is what happened

As you can see I got an orange mesh appear, this is showing me where the objects will come to rest, in other words, the spaces that have been a bother.

I lowered the thinness for the and I got the result I wanted, it was quite hard knowing where I needed to stop becasue I couldn't see the original objects, I had to switch to wireframe to get a better idea. This is how it turned out.


Problem solved!!
There are other aspects of nCloth which i still need to tackle, i need to be able to pick it up from a corner and have it move naturally incase thats what kofi wants, this is as far as I have gotten with character interaction

It's not much but I believe with a little bit more parctise it can be done.

In the image above you can see the stage after I have created nCloth in Maya, at this stage all that is happening is the default gravity in Maya is pulling the cloth down. I found that it will not interact with its surroundings, in the case the bed, if you don't tell it to. To allow objects in the scene to interact with the cloth I needed to add to the object the tool called Create passive collider. This will allow the cloth to land and take form around the object.

at this point in the task I found myself trying to make the cloth stay on the bed, as you can see in the image below the cloth is sliding off to one side, I tried a number of things like trying to key frame is position to stop it falling off, this didn't work and I found myself searching through the internet. After a long while I found that when you add the Create passive collider to an object it creates preferences allowing you to increase certain options on the object. These options are Bounce, friction and stickiness.
What I found when upping the Bounce up to a higher number then 0.050 you will get a slight bounce of the mattress when the cloth hit it, which in real life does not happen. I turned this option all the way down. When it came to friction I found that I had found the answer to my earlier problem, when I turned this up and played my animation through the cloth stayed on the bed and did not slide off. I was very pleased with the results. stickiness is the opposite to the bounce option, it means that if the cloth hit it once then it would stay in that position and not move, it would also have very little influence when it becomes effected by Maya fields such as wind or gravity.
It seemed like the more and more I looked into nCloth and its options the more and more problems my cloth got. After close inspection I realised that I was getting mesh deforming into itself, the image below shows what I mean with this problem.
I found out that this is called clipping and its very common when using nCloth, there are options to pain on thickness where is happens but I know that it's not too noticeable when the cloth is thinner, as you can see its way thick in my project. I will later try and thick this by scaling the mesh down.

I came across a rather simple problem when it came to nCloth; this was that I couldn't change the colour of my Lambert! It's usually in the attribute editor but it just wasn't there, I was stuck with red if Kofi asked for a different colour. As you can see there is no Lambert attribute menu.
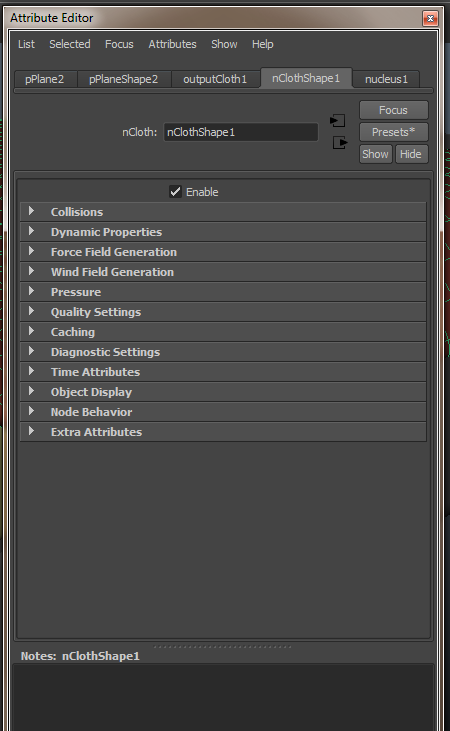
I researched how to do it and I kept finding AE display under the nCloth submenu, however, these were all on earlier versions of Maya and in Maya 2011 it wasn't there. After a few hours of trying I found myself in the help menu of Maya and asking for AE Display, this is what came up

Another problem solved. I could now change the colour of my mesh! (I late found out that I could have also used the hypershade......)

While doing my research I came across a very interesting tool which allowed me to play with the mesh while it was being animated. For example I could interact with it mess with my passive colliders such as the mattress.
In the pictures bellow I tired to show what I meant. The tool is called interactive playback, and I used it to quickly move the mattress up then down to get result shown bellow. I know it won't seem clear but the mesh actually turned almost 360c.

This next image is of another interactive playback test, I tried a smoother approach and let the cloth deform slowly, it wasn't a perfect deformation but I could see how the gravity was affecting the cloth.
It was quite fun!

My next problem with nCloth was this strange space that was leaving between the mesh and the passive collider,

I must admit I almost gave up on this one, what I found that kind of work but reset itself each time was moving the passive collider to the right place once the mesh had settled, this was obviously pointless and could not be used in a final film. The gap was really annoying.
what I found was that in the attribute editor you have an option of seeing the collision thinness, this is available for both nCloth mesh and Passive colliders, if you look under collisions> solver display you can see that right now it's turned off so I cant much at the moment.

As I turned it on for both mesh and passive collider this is what happened

As you can see I got an orange mesh appear, this is showing me where the objects will come to rest, in other words, the spaces that have been a bother.

I lowered the thinness for the and I got the result I wanted, it was quite hard knowing where I needed to stop becasue I couldn't see the original objects, I had to switch to wireframe to get a better idea. This is how it turned out.


Problem solved!!
There are other aspects of nCloth which i still need to tackle, i need to be able to pick it up from a corner and have it move naturally incase thats what kofi wants, this is as far as I have gotten with character interaction

It's not much but I believe with a little bit more parctise it can be done.
Tuesday, 4 January 2011
UV mapping
UV mapping is another area where i want to concentrate on, i believe that a good model is nothing without a good texture and to have a good texture it must be UV mapped. I have made loads and loads of models on maya but ive never moved beyond just simply adding shaders. I guess you could say was too scared that it would be too complicated to UV map them. SO for this unit I have looked at UV mapping and I will show my process in the blog. I will be UV mapping a sofa that ive modeled for Andys film.
here is the sofa i will be working on, this has been rendered in acclusion to show the strarting model as best as possible.

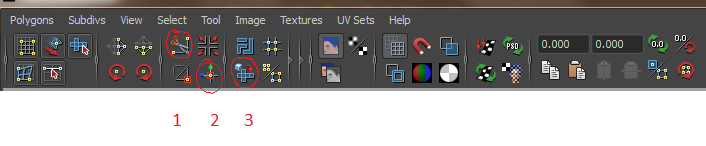
the image below shows how i have re mapped the cusions on the sofa to allow me to texture later. I used the cut tool (1) the sew tool (2) and the unfold tool (3) to get the result below.


here is the sofa i will be working on, this has been rendered in acclusion to show the strarting model as best as possible.

the image below shows how i have re mapped the cusions on the sofa to allow me to texture later. I used the cut tool (1) the sew tool (2) and the unfold tool (3) to get the result below.

Sunday, 2 January 2011
Practice sculpture with mudbox
I know that later on I will have to model and then probably sculpt a character for Joe's film, I have decided to pick up on the weaker points here so I intend to sculpt a small creature just to concentrate on the detail areas such as the face. I don't know what kind of detail I will have to meet in the future when I comes to starting the model but by doing this I think I will be a step ahead as I will become familiar with a new software (mudbox) and its abilities.
I will be using a model with I have found, it is very simple and it will allow me to build up detail by sculpting rather than modelling in Maya.
Here is the model I will be using, as you can see it's very basic and it's not UVmapped. Something I will also have to learn.

When using the UV texture editor this is what came up for the body and as you can see it's pretty much useless unless I want it one solid colour all over. I needed to learn how to re map his character to be able to texture later.
 />
/>
Bellow is all the tools that I will have to use when re mapping this object, I found that you only have 3 or 4 main tool for the job, number one in the picture is the cut tool, and this tool is useful when I want to cut edges of one of the maps to stick to another. It's good to make separate things like hands from arms of head from body, areas where special detail will be needed. number two is the sew tool, this tool is used to stitch whatever needs stitching in the UV maps, for example, finding that a characters leg has been place into two sections, using this two I can make it into just one, it will also move it into place.
Number 3 is the unfold tool, this tool is useful when the UVs are too close together or are on top of each other. This tool is also very helpful when you have all the UVs selected and you want to neaten things up.

Another tool which I found myself using a lot was the To Shell tool, this allowed you to move whole areas, or shells e.g. the head across the grid without selecting other UVs from other maps. I also found that when I swathed on the borders I was able to see where cutting had taken place.

When I got to grips with the whole task of UV mapping I had this as a result!

Now that at this point I had sorted out the UVs it was time to start to sculpt. From YouTube videos I noticed that when sculpting in mudbox you start off with a very low quality mesh, at this point its best to get the shape right before adding detail as detail will not show up. By pressing Shift and D the mesh smoothes itself out adding to the poly count and therefore allowing more out the geometry. I problem that I encountered during the sculpting progress was that I couldn't figure out how to lower the levels in the geometry, this was a simple Page Up or Page Down on the keyboard of a PC, I'm still trying to find out for Mac.
the whole idea of sculpting has really motivated me to do another things, from what I have found out mudbox allows you to very creative, it's also very easy to use and I could easily get a nice result in just a few hours.
After following a few tutorials I found myself being quite experimental with the tools, I also understood the idea of having mesh levels,
This is what I managed to do in mesh level one

At this stage adding detail is very pointless just because it's probably not even possible. I would need more polygons to play with.
This was one of the tutorials that really help me understand how things worked in Maya, the guy in the video makes it very clear of how to use the tools
I found that it's very simple to get detail in, in the lower levels of geometry you add the shapes, and then in the higher levels you add the details. after a few hours of playing around and making a few mistakes I got to this stage on the image bellow, as you can see its looking a lot more like a character than just polygons. I have also added some eyes, there were just simple spheres colours in white. I believe this was at level 4 of geometry.

The next level below is level 5, as you can see I was able to add more detail and start to give some personality to the model, I have added wrinkles and I have made the ears point up again.

All I did in this level was add more detail, that how easy things work in mudbox, I find it much easier than zBrush. In level 6 I have started to use stencils, these allow you to add skin like texture to your models, it's a very fast way to add detail as all you do it paint it on.

after being quite pleased with the detail I had made I started to look into layers, layers are good for making clothing in mudbox, to be honest I didn't find it every good in terms of detail. All I did was flood the mesh with a larger copy of itself and then just take away to leave behind a very poor clothe like shape.
This is what I mean.

As you can see above, the mesh has got fatter.

When I used the mask tool is allowed me to take away from the new mesh exposing the old one under it, I could also lower the opacity to make the fatter mesh thinner. At this level of fatness it wasn't very good to sculpt with.
Here is an image of how the opacity changes the mesh, as you can see on the right the opacity is now at 30 and not 100 like before. You can really tell the difference when looking closely at the neck area.

After adding another layer to the first one I did I managed to get a tight clothing effect, I was blown away by the outcome but I guess that's as good as I can do for now.

My next bit would be to add colour to my model, I found a tutorial in YouTube which showed me how to do it, and I found that the tutorial was quite complicated but I managed to work from it and only really concentrating on the main parts.
After a while of practicing with paints I managed to give the character a greeny gray texture, I also added a porcelain material to the eyes and then painted the pupil on. This all was a lot simpler than it looks.
Here is what I managed to do using the paint tools and layers in mudbox.

Here is what it looks like on the UV map, as you can see the pain is where is should be in the model, I have learnt that with mudbox I can texture anything I want as long as I have UV mapped the object. I plan to do this in the future to get a better result when it comes to working on my other films.
I will be using a model with I have found, it is very simple and it will allow me to build up detail by sculpting rather than modelling in Maya.
Here is the model I will be using, as you can see it's very basic and it's not UVmapped. Something I will also have to learn.

When using the UV texture editor this is what came up for the body and as you can see it's pretty much useless unless I want it one solid colour all over. I needed to learn how to re map his character to be able to texture later.
 />
/>Bellow is all the tools that I will have to use when re mapping this object, I found that you only have 3 or 4 main tool for the job, number one in the picture is the cut tool, and this tool is useful when I want to cut edges of one of the maps to stick to another. It's good to make separate things like hands from arms of head from body, areas where special detail will be needed. number two is the sew tool, this tool is used to stitch whatever needs stitching in the UV maps, for example, finding that a characters leg has been place into two sections, using this two I can make it into just one, it will also move it into place.
Number 3 is the unfold tool, this tool is useful when the UVs are too close together or are on top of each other. This tool is also very helpful when you have all the UVs selected and you want to neaten things up.

Another tool which I found myself using a lot was the To Shell tool, this allowed you to move whole areas, or shells e.g. the head across the grid without selecting other UVs from other maps. I also found that when I swathed on the borders I was able to see where cutting had taken place.

When I got to grips with the whole task of UV mapping I had this as a result!

Now that at this point I had sorted out the UVs it was time to start to sculpt. From YouTube videos I noticed that when sculpting in mudbox you start off with a very low quality mesh, at this point its best to get the shape right before adding detail as detail will not show up. By pressing Shift and D the mesh smoothes itself out adding to the poly count and therefore allowing more out the geometry. I problem that I encountered during the sculpting progress was that I couldn't figure out how to lower the levels in the geometry, this was a simple Page Up or Page Down on the keyboard of a PC, I'm still trying to find out for Mac.
the whole idea of sculpting has really motivated me to do another things, from what I have found out mudbox allows you to very creative, it's also very easy to use and I could easily get a nice result in just a few hours.
After following a few tutorials I found myself being quite experimental with the tools, I also understood the idea of having mesh levels,
This is what I managed to do in mesh level one

At this stage adding detail is very pointless just because it's probably not even possible. I would need more polygons to play with.
This was one of the tutorials that really help me understand how things worked in Maya, the guy in the video makes it very clear of how to use the tools
I found that it's very simple to get detail in, in the lower levels of geometry you add the shapes, and then in the higher levels you add the details. after a few hours of playing around and making a few mistakes I got to this stage on the image bellow, as you can see its looking a lot more like a character than just polygons. I have also added some eyes, there were just simple spheres colours in white. I believe this was at level 4 of geometry.

The next level below is level 5, as you can see I was able to add more detail and start to give some personality to the model, I have added wrinkles and I have made the ears point up again.

All I did in this level was add more detail, that how easy things work in mudbox, I find it much easier than zBrush. In level 6 I have started to use stencils, these allow you to add skin like texture to your models, it's a very fast way to add detail as all you do it paint it on.

after being quite pleased with the detail I had made I started to look into layers, layers are good for making clothing in mudbox, to be honest I didn't find it every good in terms of detail. All I did was flood the mesh with a larger copy of itself and then just take away to leave behind a very poor clothe like shape.
This is what I mean.

As you can see above, the mesh has got fatter.

When I used the mask tool is allowed me to take away from the new mesh exposing the old one under it, I could also lower the opacity to make the fatter mesh thinner. At this level of fatness it wasn't very good to sculpt with.
Here is an image of how the opacity changes the mesh, as you can see on the right the opacity is now at 30 and not 100 like before. You can really tell the difference when looking closely at the neck area.

After adding another layer to the first one I did I managed to get a tight clothing effect, I was blown away by the outcome but I guess that's as good as I can do for now.

My next bit would be to add colour to my model, I found a tutorial in YouTube which showed me how to do it, and I found that the tutorial was quite complicated but I managed to work from it and only really concentrating on the main parts.
After a while of practicing with paints I managed to give the character a greeny gray texture, I also added a porcelain material to the eyes and then painted the pupil on. This all was a lot simpler than it looks.
Here is what I managed to do using the paint tools and layers in mudbox.

Here is what it looks like on the UV map, as you can see the pain is where is should be in the model, I have learnt that with mudbox I can texture anything I want as long as I have UV mapped the object. I plan to do this in the future to get a better result when it comes to working on my other films.
Monday, 20 December 2010
park bench for joe's work
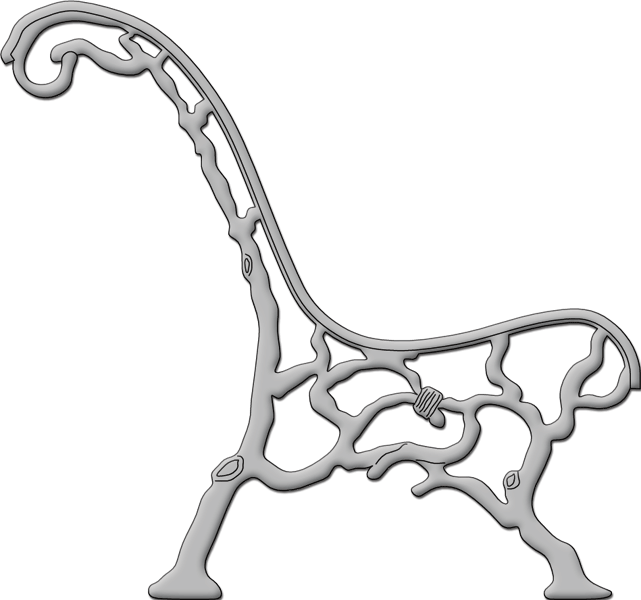
I am set a job for Chance meeting which involves me modelling a quite difficult park bench, at first I didn't think it was possible but I gave it a shot and said yes to Joe.
Here is what he gave me to work with, as you can see, it's not very clear but it's good enough for an idea.

From the first glace I gave this picture I knew I would have to use nurbs circles and the loft tool, it might not be the perfect way to do it but that's what came into my head. What I found every useful when using this tool was that I was able to follow the curves down with simple nurbs circles.

Here is another image which was given to me for reference, as you can see it's not very clear but it gives a good indication of length and textures. I didn't use this image for the modelling but it did give me an idea of how the wood is placed from the front.

As you can see the modelling is all most finished, there are a few aspects to come back to but I just wanted to have a go on the textured as I now know that the bench will NOT be used for the shots, this is because the real bench has returned to the park!
At this current stage I was quite pleased with the results, I hadn't textures the metal supports but I was having a go at the wood. It's not perfect but it's a start.

Above is the "finished" bench, I have things like the legs to finish and some areas in the supports but I think it's turned out quite well. Texturing was not as hard as I thought but I know not to underestimate the process. Things like finding the best surface textures or using the right shaders will either fool us into believing its real or simply make others point out your crappy work.
Here is what he gave me to work with, as you can see, it's not very clear but it's good enough for an idea.
From the first glace I gave this picture I knew I would have to use nurbs circles and the loft tool, it might not be the perfect way to do it but that's what came into my head. What I found every useful when using this tool was that I was able to follow the curves down with simple nurbs circles.

Here is another image which was given to me for reference, as you can see it's not very clear but it gives a good indication of length and textures. I didn't use this image for the modelling but it did give me an idea of how the wood is placed from the front.

As you can see the modelling is all most finished, there are a few aspects to come back to but I just wanted to have a go on the textured as I now know that the bench will NOT be used for the shots, this is because the real bench has returned to the park!
At this current stage I was quite pleased with the results, I hadn't textures the metal supports but I was having a go at the wood. It's not perfect but it's a start.

Above is the "finished" bench, I have things like the legs to finish and some areas in the supports but I think it's turned out quite well. Texturing was not as hard as I thought but I know not to underestimate the process. Things like finding the best surface textures or using the right shaders will either fool us into believing its real or simply make others point out your crappy work.
rigging
As I have agreed to rig a model for a movie I have started to practice to remind myself of how to go ahead with it. There are so many things that I have forgotten about like pole vectors.

Here is a quick test of how would add the joints to the geometry, this is basic due to the fact that I was only using it as a quick test. It turned out to work just fine!

The picture above shows how when an ik handle is added and the join is skinned it will bend in a quick organic result.

The images above shows a model that I came across and decided to rig it, at first I found myself just messing around with the arm and hand, the next step would be to add the ik handle.

This image is before I placed the joins in the right place, e.g. shoulder, elbow and wrist.

This next images I have finished half the skeleton and I am joining the shoulder joint to the main section. I believe I have also added the ik handle.

In this picture I am placing the wrist joint and all the finger joints in the right place to then add the nurbs circle for easy selection to the ik handle.

Using the model for a guide line

I have now finished the placements of the joints, I have also mirrored it and it's now ready to add all the other handles and set driven keys.

Here is another practice rig but on an odd shaped character, I started with the easiest part, the tail, I then added the rest of the skeleton.

As you can see the tail now has an ik handle and is able to move in a tail like manner, I found this very simple to use!
Subscribe to:
Posts (Atom)